
mix-Buss Compression
Unlike Digital Audio Workstations, Analog Consoles feature an exclusive Compressor which all of the channels sum to before exiting the console. This gives a sort of continuity to the entire piece as a whole. A lot of Digital Music of today is lacking this “finishing touch” that can be provided by replicating the same reactions using our DAW.

While a handful of engineers will agree never to place anything on your Master Channel, the other half of engineers will swear by it. This technique has been used for many years on many of the records you know and love. Agreeing with both perspectives, the goal here should be to transparently enhance the Mix, not lather effects onto it.
Here is a close-up picture of an SSL 4000 Series Mix Buss Compressor:

Remember the parts used in every Mix Buss Compressor is different, providing each its own character to your Mix, and some may work better than others depending on the song. This is why it helps to have a couple Mix-Buss Compressors to choose from.
I suggest using an ‘Analog’ Mix-Buss Compressor on your Master Channel when using any Digital Audio Workstation. The reason will become clear when done correctly. 

You’ll want your Master summing between -3dBFS/-6dBFS. Your Master Channel fader should be at 0dB. (Untouched)
First, let’s ask. What makes a “Mix-Buss” Compressor?
Mix-Buss Compressors are Stereo Analog Compressors capable of handling multiple Signals. Many Digital Compressors are designed to perform best using a single Signal.
Mix-Buss Compressors should also have an attack time of at least 30ms. This is because we don’t want to much Compression reactivity over the entire Mix. A little goes a long way!
The reason it helps to use something Analog is you will receive added Saturation, even using Virtual Analog, as many Plug-ins of today are designed to re-replacate these reactions.
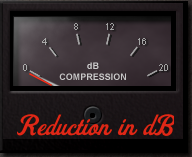
Gain Reduction Meters show us how much of the Signal is being Reduced (above the Threshold)Part of successfully using Mix Buss Compressors correctly on your Master Channel is ensuring that you are not Over-Compressing. If done wrong, Mix Buss Compression can ruin your entire song and be frustrating.
There are 2 basic kinds of Gain Reduction Meters.
Digital GR Meters, and Analog VR Meters.
Digital Gain Reduction Meters show us a visual histogram of our gain over time.
 They may also be used like this
Analog Gain Reduction Meters are ideal when using Mix Buss Compressors. To use these we want to Lower our Threshold, until the Needle bounces up, returning back to Zero on the downbeat of every quarter note.


Compressing the entire Mix past this point will begin to over compress. (Sidechain Filters may be used however we are discussing broadband Mix Buss Compression at this time.)
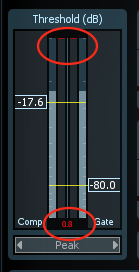
How To Initialize Any Mix Buss Compressor
Attack: Slow
Release: Fast
Ratio: 2:1 – 4:1
Threshold: Maximum Level
Make-up Gain: 0dB – 0.5dB

In this example I’m using the SSL Mix Buss Compressor. You’ll want to set it up like this, before you begin to Compress the entire track. 2:1 or 4:1 may be used, however start with 2:1 first and seeing how your track reacts. If the needle moves at maximum threshold, check your dBFS level on your Master Output. If the Master’s summation level is between -3/-6dBFS, you may switch your ratio to 4:1. Remember to watch the Gain Reduction Meter, to ensure you are not over-compressing your entire Mix.
In this example I’m adding a subjective amount of gain of .5dB. There shouldn’t be a change in volume, so all you may need is a maximum of .5dB boost to get it back to full volume. We shouldn’t ever use this to make our track louder.
Input Gain should match Output Gain!
The only way to truly understand the effect that incorperating Mix Buss Compressors will have on your entire Mix, is by doing it for yourself and listening for the results that occur. Here are some good Mix Buss Compressors to help get you started, and the settings to initialize them.

We shouldn’t need the fancy bells and whistles that come with some Mix Buss Compressors. (If you want more “Punch”, add it in your Mix!) This should only enhance your Track, providing consistency.

The Cytomic Glue is Designed to react exactly like the SSL Mix Buss Compressor.
Oversampling can help reduce distortion, and may improve the quality of your signal. Test this for yourself.
This is an API 2500. Notice the Tone controls are subjective, as well as the Stereo Linking. There really isn’t a set rule with these kinds of things, as long as you clearly understand the changes they make to your sound. Compression Knees depend on the Track, and generally a soft knee is less noticeable, however we aren’t looking to get more than a few dB of reduction from our transients, so again this area is subjective.
Remember to A/B Bypass your Mix Buss Compressor of choice so you can hear the before and after. Gain-staging the Input/Output meters will also ensure that you get maximum results. Even if turning it up louder than -3dBFS sounds good, refrain from it for now, until the Mastering Stage.
Below, the SSL uses the “IN” button to A/B Bypass

